Blog · Guides · 6 min read
Moving to Home Assistant without leaving your Apple Home behind
Bring your Apple Home accessories into Home Assistant without re-pairing anything, keep Siri and the Home app working, and move over at your own pace.
By Rob Parker
Most people who move to Home Assistant don't move in a weekend. They move one room at a time, around a family who'd quite like the lights to keep working in the meantime — and around years of Apple Home setup: rooms, scenes, automations, the Siri commands everyone's learned, the accessories that only ever spoke HomeKit.
The usual advice is to take your accessories out of Apple Home and pair them to Home Assistant directly. That works, and for some people it's the right end state. But it's a one-way door per accessory, it happens all at once for each one, and the moment you do it, that light disappears from Siri and the Home app for everyone else in the house.
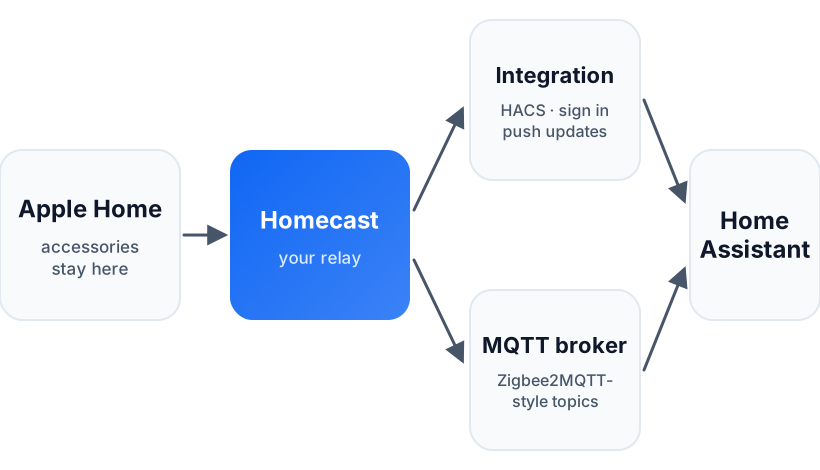
There's a gentler way: leave Apple Home exactly as it is and let Home Assistant see it, through Homecast. Nothing gets re-paired, nothing leaves Apple Home, and you can move over at whatever pace suits you.
Why not pair accessories directly?
Home Assistant's own HomeKit Device integration pairs to accessories the same way an iPhone does — and its documentation is clear that a HomeKit accessory can only be paired to one controller at a time. To bring one into Home Assistant that way, you remove it from Apple Home first.
Homecast works the other way round. It talks to your accessories through Apple Home, from a Mac that's signed in to it. So Apple Home keeps everything — scenes, automations, Siri, sharing with your family — and Home Assistant gets a live view of all of it, with control.
Install the integration
The Homecast integration is installed through HACS, the community store for Home Assistant. It needs Home Assistant 2026.4 or later.
- In HACS, open the ⋮ menu at the top right and choose Custom repositories.
- Add
https://github.com/parob/homecast-hasswith the type Integration. - Search HACS for Homecast, download it, and restart Home Assistant.
Then go to Settings → Devices & services → Add integration and choose Homecast. It asks how to connect:
- Homecast Cloud sends you to Homecast to sign in. You'll see the same screen as any app asking for access: tick the homes Home Assistant should see, and choose View only or Full control for each.
- Homecast Community connects to the free Community Edition running on a Mac on your network. If Home Assistant can see the Mac, it'll offer it to you automatically; otherwise enter its address, such as
http://my-mac.local:5656, and sign in there.
Your accessories then appear as devices, with each HomeKit room suggested as a Home Assistant area. If you have more than one home, the areas are named Home – Room so they don't collide.
What comes across
| In Apple Home | In Home Assistant | What you can do |
|---|---|---|
| Lights | Light | On/off, brightness, colour, colour temperature |
| Switches and outlets | Switch | On/off |
| Thermostats, air conditioners, radiators | Climate | Only the modes the unit supports, target temperature, current temperature and humidity, what it's doing now |
| Blinds and window coverings | Cover | Position, open, close |
| Fans | Fan | On/off, speed |
| Locks | Lock | Lock and unlock |
| Security systems | Alarm panel | Arm home, away or night, and disarm |
| Motion, contact, leak, smoke and CO sensors | Binary sensor | Detected, open or closed |
| Temperature, humidity and light sensors | Sensor | Readings, including the extra sensors inside multi-sensors |
| Anything with a battery | Sensor | Battery level and a low-battery warning |
| HomeKit groups | The group's type | Controls every member at once |
Changes are pushed to Home Assistant as they happen over a WebSocket, so an automation in Home Assistant can react to a door opening in Apple Home straight away. A full refresh every five minutes catches anything that slipped through.
What doesn't come across (yet)
I'd rather you know now than find out halfway through a migration:
- Garage doors, air purifiers, humidifiers, valves, speakers, TVs and cameras don't have Home Assistant entities yet.
- Apple Home scenes and automations stay in Apple Home. They keep running there — you just can't trigger or edit them from Home Assistant.
- Names are rebuilt from Homecast's identifiers, so a light called TV may arrive as Tv. Rename anything you like in Home Assistant; it doesn't change Apple Home.
- New accessories you add to Apple Home show up after you reload the integration.
The MQTT route
If you already run an MQTT broker, Homecast can publish your home to it instead, following the same conventions as Zigbee2MQTT: each accessory's state on its own topic, and a /set topic to control it.
- With the Community Edition, turn on Developer Mode in the Homecast app on your Mac, then add your broker under Settings → Homes → your home → MQTT with HA Auto-Discovery switched on. Homecast publishes discovery messages so Home Assistant's MQTT integration can pick your accessories up — though the integration above is the route we test most, so start there if you can.
- With Homecast Cloud, switch on Homecast MQTT Broker for a home (it's under the same section, with Developer Mode on in Settings → Account) and point Home Assistant's MQTT integration at
mqtt.homecast.cloudon port 8883, with a Homecast access token as the password. The cloud broker doesn't publish Home Assistant discovery, so you'd define the entities yourself — for most people the integration above is the better route.
The MQTT reference has the topic layout.
Migrating at your own pace
The best part of doing it this way is that nothing forces the pace. A few patterns that work:
- Start with automations, not devices. Leave every accessory where it is and rebuild your trickier automations in Home Assistant, which can do things Apple Home can't. If one misbehaves, the original is still in Apple Home.
- Move accessories when there's a reason to. When a Zigbee sensor or a Z-Wave lock needs Home Assistant anyway, move it. Your HomeKit accessories can stay in Apple Home indefinitely and still be part of Home Assistant automations.
- Keep the family on what they know. Siri, the Home app and Homecast's own apps for the Android phones in the house all keep working throughout.
One thing to avoid: if you also use Home Assistant's HomeKit Bridge to show Home Assistant devices in Apple Home, leave the Homecast entities out of it. Otherwise everything appears in the Home app twice — once as itself, and once as Home Assistant's copy.
Before you start
- Your relay needs to be running. With the Community Edition or your own Mac as the relay, Home Assistant loses Apple Home whenever that Mac is asleep or off. On the Cloud plan we run the relay for you.
- View only is a good first step. Connect with view-only access while you explore, and upgrade to full control when you start automating.
The full details are in the Home Assistant guide.