Blog · Guides · 12 min read
Make your Apple Home tell you when to leave for the train, and whether to take an umbrella
Two Homecast automations that turn a colour bulb into a departure board and a rain warning. No server, no API keys, nothing to install.
By Rob Parker
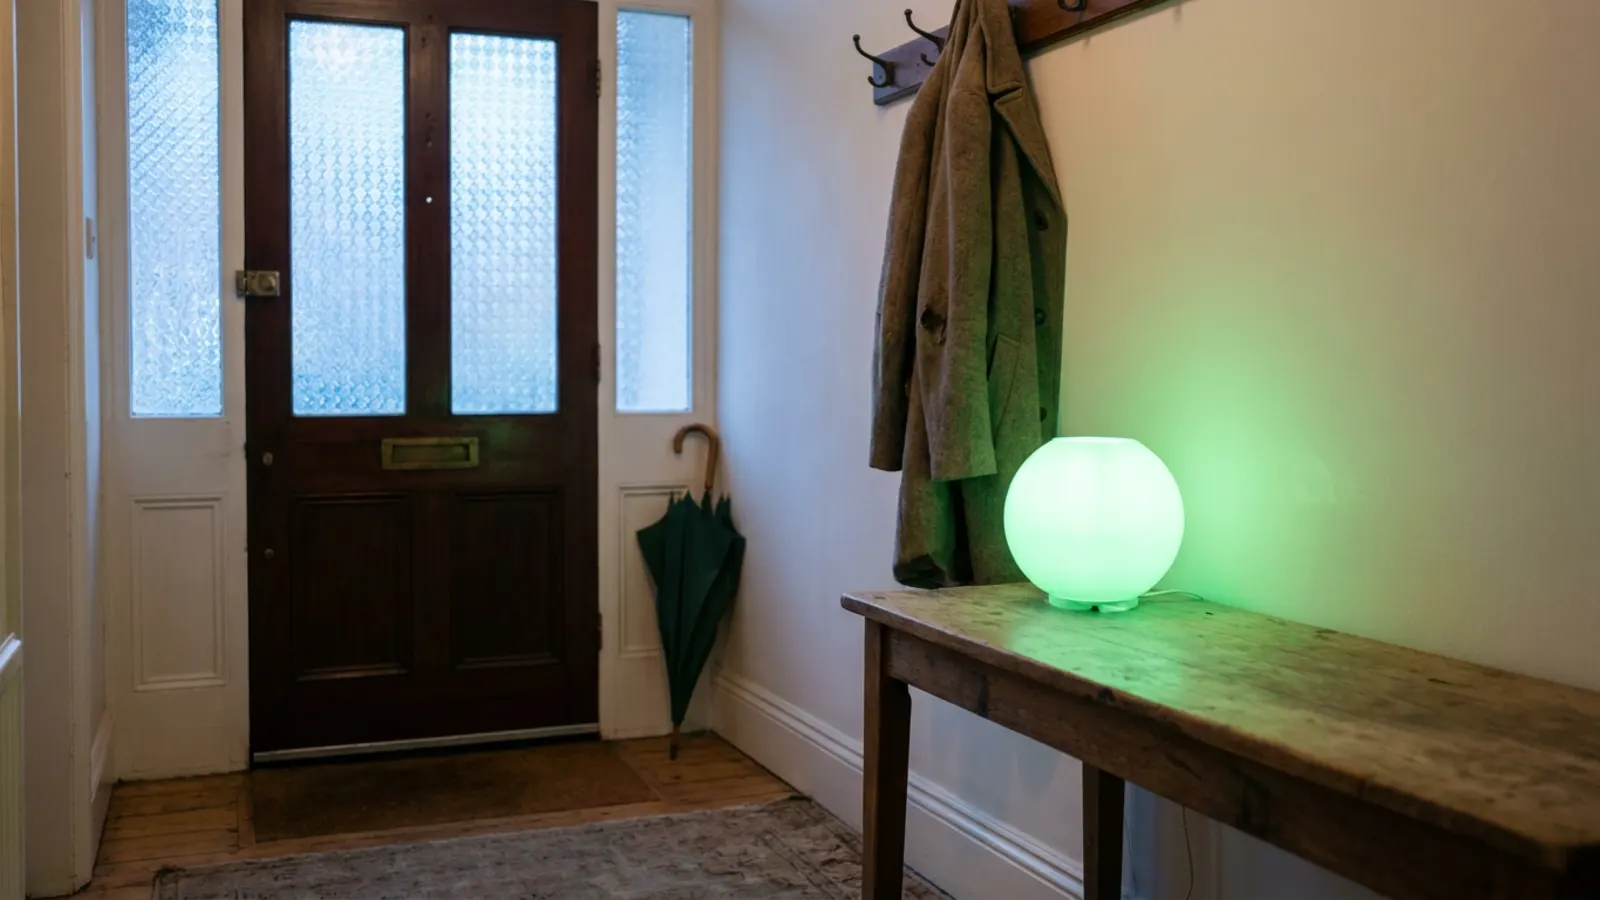
I get the Thameslink from Sevenoaks to Blackfriars. Like a lot of commuter lines it runs every half hour for most of the day, so leaving the house at the wrong moment doesn't cost a minute — it costs thirty, on a platform.
You probably know the routine: coat on, standing in the hall, refreshing a train app and trying to work out whether you'll make this one. Then you get to the station and realise it's going to rain on the walk home.
So I made a lamp in the hall do the thinking. It's green when it's a good time to leave, and gets brighter as the perfect moment approaches. It's amber when I'd only be standing on the platform. It turns red when something's wrong with the trains. And on mornings when it's going to rain, my phone tells me to take an umbrella before I've found my keys.
Both of these are plain Homecast automations, built in the visual editor. There's no server to run, no API key to sign up for and no code to host. There is a little JavaScript — about twenty lines for the train light — and I've written it so you only change the numbers at the top.
What you need
- A colour bulb in Apple Home, anywhere you'll see it on the way out. A Hue colour lamp, a Nanoleaf, anything with colour.
- Homecast with a relay running. Automations run on the relay — the Mac running Homecast, or our hosted relay on the Cloud plan. If you run your own Mac it needs to be awake in the morning, which it already is if Homecast is your relay.
- Ten minutes.
How it works
Both automations have the same shape, and it's a pattern worth knowing because it works for almost any public data:
- A schedule wakes the automation up.
- An HTTP Request fetches some data from the internet.
- A Code node turns that data into a decision.
- Set Device shows the decision on a light, and Notify puts it on your phone.
The HTTP Request runs on your relay as an ordinary web request, so it can only talk to services that allow that from a browser. Both of the ones here — Open-Meteo for the weather and Transport for London's API for trains — are free, need no key, and do.
Part 1: the umbrella light
Start with the weather. It's simpler, and it teaches the whole pattern.
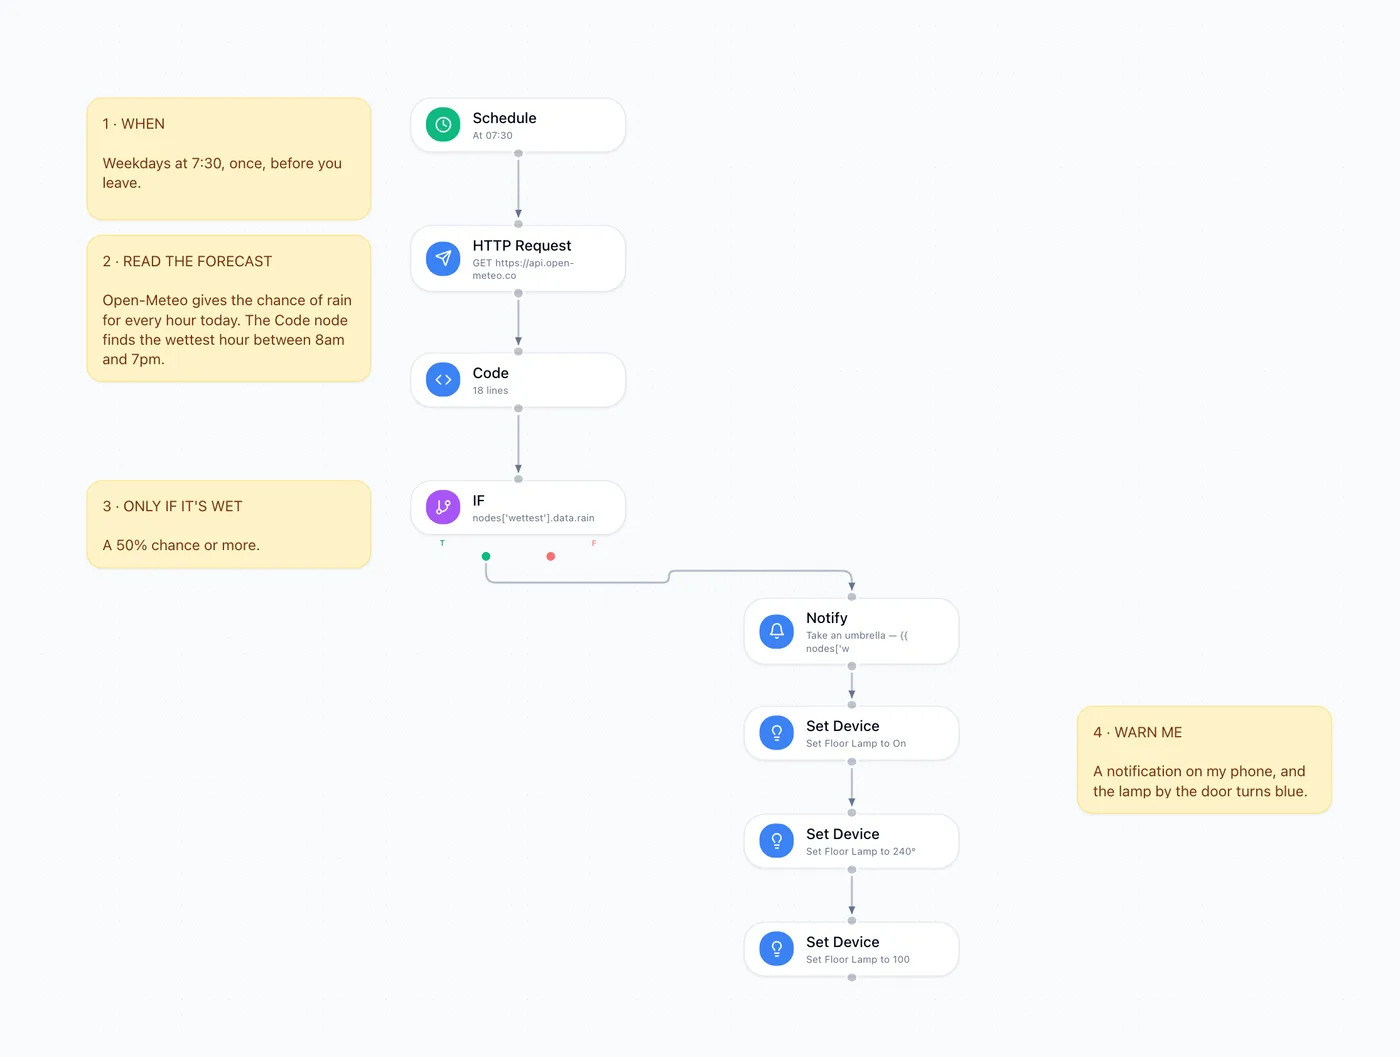
Open Automations from the menu at the top right of the dashboard, choose Create, pick Homecast as the kind of automation, and add these nodes in order. Clicking a node in the list on the left drops it on the canvas; to connect two, drag from the dot at the bottom of one to the dot at the top of the next. An IF has two dots underneath — green for true, red for false.
1. Schedule. Choose At a specific time, set it to 07:30, and pick Monday to Friday.
2. HTTP Request. Method GET, and this URL, with your own latitude and longitude:
https://api.open-meteo.com/v1/forecast?latitude=51.27&longitude=0.19&hourly=precipitation_probability&forecast_days=1&timezone=auto
Those coordinates are Sevenoaks. To find yours, right-click your town in Google Maps or Apple Maps and copy the numbers it shows — two decimal places is plenty for weather. The response is a list of hours with a chance of rain for each.
3. Code. Paste this. It finds the wettest hour between 8am and 7pm:
const RAINY = 50;  // % chance of rain that's worth an umbrella

// The forecast, from the HTTP Request node before this one
const forecast = Object.values(input.nodes)
  .map((node) => node.data && node.data.body)
  .find((body) => body && body.hourly);

const { time, precipitation_probability: chance } = forecast.hourly;
let worst = { chance: 0, at: '' };
time.forEach((t, i) => {
  const hour = Number(t.slice(11, 13));
  if (hour >= 8 && hour <= 19 && chance[i] > worst.chance) {
    worst = { chance: chance[i], at: t.slice(11, 16) };
  }
});

return { rain: worst.chance >= RAINY, chance: worst.chance, at: worst.at };
4. IF. Switch it to Expression. Pick the Code node from the data list — it inserts something like nodes['…'].data.result — and replace result at the end with rain, so it reads nodes['…'].data.rain.
5. On the true branch, add:
- Notify, with a message like
Take an umbrella — {{ nodes['…'].data.chance }}% chance of rain around {{ nodes['…'].data.at }}. Copy thenodes['…']part from your IF expression, so it points at the same Code node. - Set Device three times on your lamp: Power State on, Hue 240 (blue) and Saturation 100. Each Set Device node changes one thing, and without the saturation a lamp last used on white stays white.
That's it. Save it, then open it again, select the Schedule node and press Run Test to try it without waiting for 7:30. The Executions tab shows each step's input and output, which is the quickest way to check the Code node is reading the forecast.
Part 2: the train light
The train light is the same shape, running every minute instead of once a day.
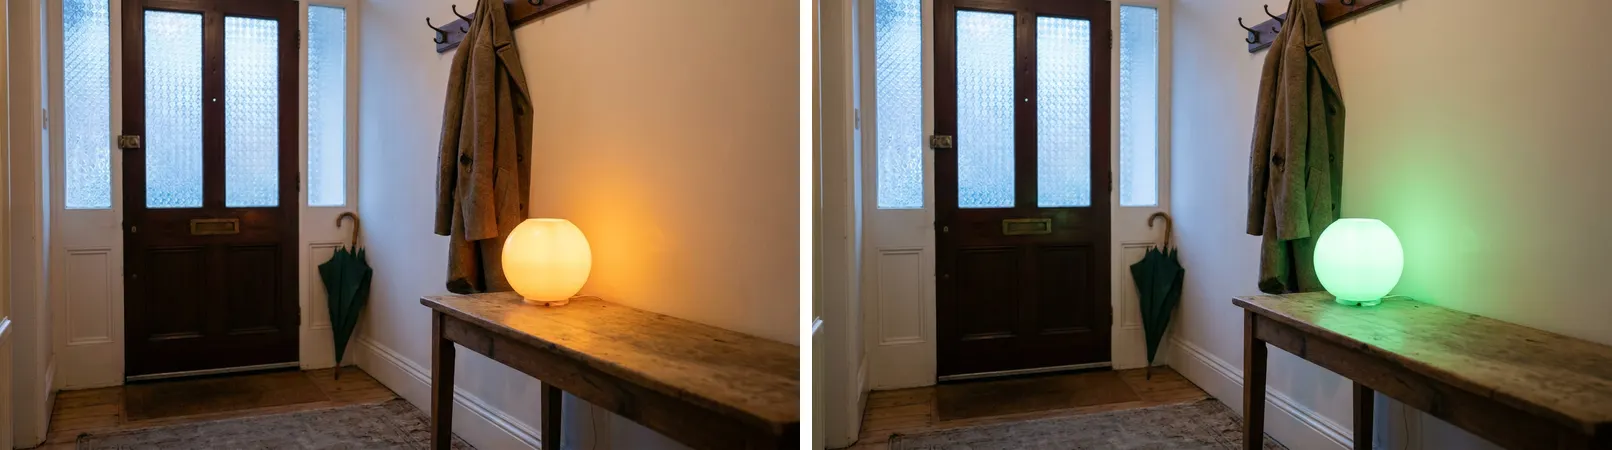
It reads like this:
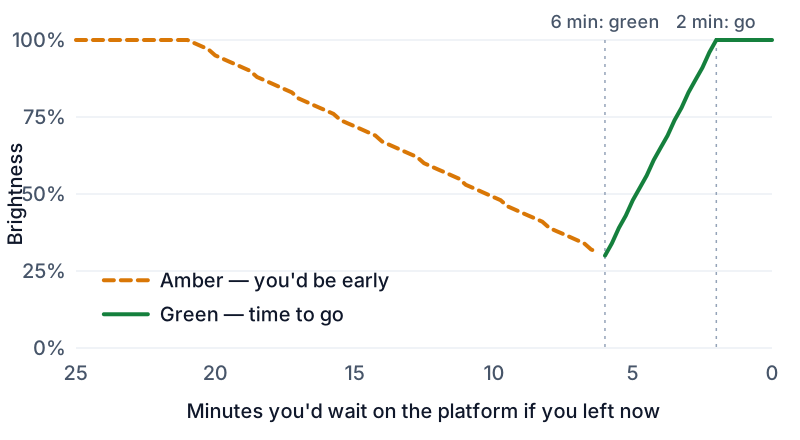
- Green means it's a good time to leave. The brighter the green, the closer you are to the ideal moment — at full brightness, walk out of the door.
- Amber means leaving now would just have you standing on the platform. The brighter the amber, the longer the wait.
- Red means something's wrong with your journey: the train you'd catch is running ten minutes or more late, either leaving or getting in. Check before you set off.
On a normal morning it fades from bright amber to dim amber, flips to dim green, brightens to full green — that's your moment — and when that train becomes impossible to catch, it jumps back to amber for the next one.
Plan the journey, not the station
A departure board shows every train leaving your station, including the ones that don't go where you're going. From Sevenoaks, some Thameslink trains run to London Victoria, which is no use if your office is in Blackfriars — and the quickest way in is often a Southeastern train to London Bridge and one stop on the Thameslink from there.
So instead of a departure board, the light asks Transport for London's journey planner — which covers National Rail journeys into London as well as the Tube. Ask it for a journey and it only ever answers with trains that get you there, with live times for each leg:
https://api.tfl.gov.uk/Journey/JourneyResults/910GSVNOAKS/to/910GBLFR?mode=national-rail
Those two codes are Sevenoaks and London Blackfriars. To find yours, search for each station:
https://api.tfl.gov.uk/StopPoint/Search/Sevenoaks?modes=national-rail
and use the id from the answer. Open the journey URL in a browser and you'll see the next few journeys, each with the time it leaves, the time it gets in, every change in between, and — for each leg — the time it's expected as well as the time it's scheduled.
Build it
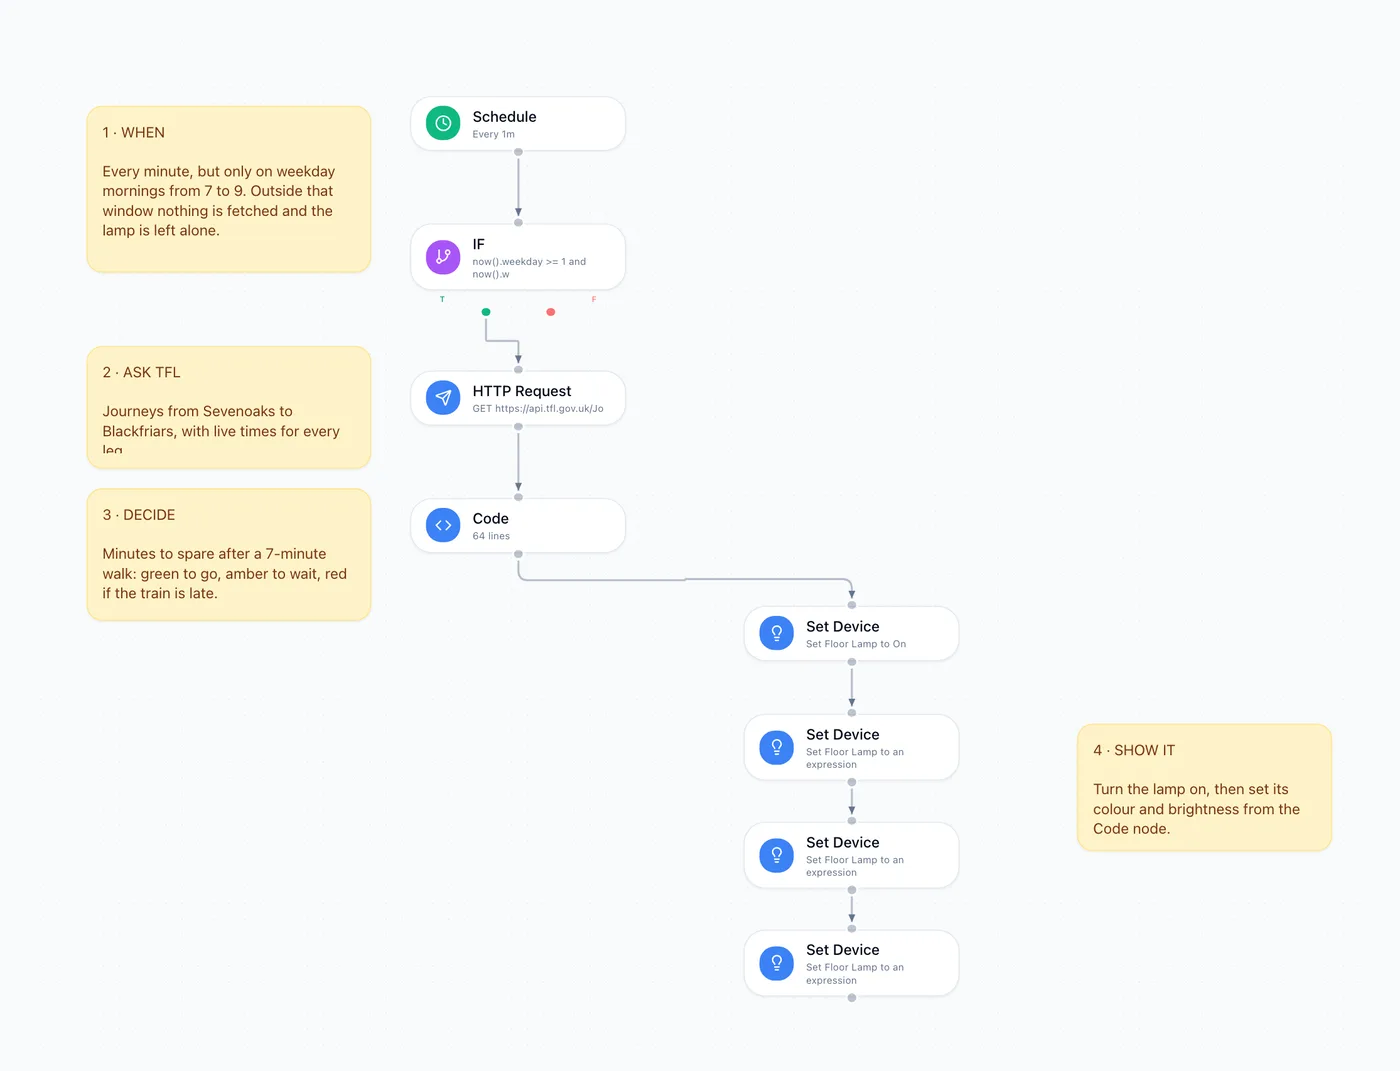
1. Schedule. Choose Repeating interval and type 1 into the minutes, for every minute.
2. IF. You only care at commute time, so stop here outside it. Switch to Expression and use:
now().weekday >= 1 and now().weekday <= 5 and now().hour >= 7 and now().hour < 9
That's weekdays, 7am to 9am. Everything below hangs off the IF's green (true) dot.
3. HTTP Request. GET your journey URL from above.
4. Code. This is the heart of it. Change the four numbers at the top to fit your walk and your patience:
const WALK = 7;      // minutes from your front door to the platform
const BUFFER = 2;    // minutes you like in hand when you get there
const PATIENCE = 6;  // the longest platform wait you don't mind
const LATE = 10;     // this many minutes late means red

// The journey planner's answer, from the HTTP Request node before this one
const plan = Object.values(input.nodes)
  .map((node) => node.data && node.data.body)
  .find((body) => body && Array.isArray(body.journeys));
const journeys = plan ? plan.journeys : [];

// TfL's times are London time with no zone on them, so read them as London time
const london = (t) => {
  const utc = Date.parse(t + 'Z');
  const zone = new Date(utc).toLocaleString('en-GB', { timeZone: 'Europe/London', timeZoneName: 'shortOffset' });
  return utc - Number((zone.match(/GMT([+-]\d+)/) || [0, 0])[1]) * 3600000;
};
const now = Date.now();
const minutesUntil = (ms) => (ms - now) / 60000;
const minutesLate = (actual, planned) => (london(actual) - london(planned || actual)) / 60000;

const options = journeys.map((j) => {
  const first = j.legs[0];
  const last = j.legs[j.legs.length - 1];
  return {
    leaves: (first.scheduledDepartureTime || first.departureTime).slice(11, 16),
    arrives: j.arrivalDateTime.slice(11, 16),
    expected: london(first.departureTime),
    late: Math.max(
      minutesLate(first.departureTime, first.scheduledDepartureTime),
      minutesLate(last.arrivalTime, last.scheduledArrivalTime),
    ),
  };
}).sort((a, b) => a.expected - b.expected);

const red = (summary) => ({ colour: 'red', hue: 0, saturation: 100, brightness: 100, summary });
const mix = (from, to, f) => Math.round(from + (to - from) * Math.min(1, Math.max(0, f)));

// The journey you'd be aiming for: the first one you could still reach on foot
const train = options.find((o) => minutesUntil(o.expected) >= WALK);
if (!train || minutesUntil(train.expected) > 90) return red('No trains to catch in the next 90 minutes');
if (train.late >= LATE) return red(`The ${train.leaves} is running ${Math.round(train.late)} min late`);

// Minutes you'd spend on the platform if you walked out of the door right now
const spare = minutesUntil(train.expected) - WALK;
const leaveIn = Math.max(0, Math.round(spare - BUFFER));
const gets = `the ${train.leaves}, in at ${train.arrives}`;

if (spare <= PATIENCE) {
  // Green, brightest when you'd arrive with BUFFER minutes in hand
  return {
    colour: 'green', hue: 120, saturation: 100,
    brightness: spare <= BUFFER ? 100 : mix(100, 30, (spare - BUFFER) / (PATIENCE - BUFFER)),
    summary: leaveIn === 0 ? `Go now for ${gets}` : `Good time to go — ${gets}`,
  };
}

// Amber, brighter the longer you'd be waiting
return {
  colour: 'amber', hue: 35, saturation: 100,
  brightness: mix(30, 100, (spare - PATIENCE) / 15),
  summary: `Leave in ${leaveIn} min for ${gets}`,
};
The summary is there for you, not the light — it reads like "Leave in 9 min for the 08:17, in at 08:56", and it's what you'll see in the run history when you're checking it works. The light always aims for the next journey that gets you to Blackfriars, direct or with a change, so when one train is out of reach it simply moves on to the next.
5. Set Device, four times, all on your lamp. The first sets Power State to on, so the lamp comes on in the morning after it's been switched off. The other three set Hue, Saturation and Brightness: for each, switch the value from Fixed to Expression and point it at the Code node's matching field, for example {{ nodes['…'].data.hue }}. The data list offers the Code node's Return Value; replace result at the end with hue, saturation or brightness.
6. One more small automation to switch the lamp off at 9:00 on weekdays, so it isn't still amber when you get home.
Tuning it
Give it a couple of mornings. If the green arrives too early, raise WALK; if you're happy to wait longer on the platform, raise PATIENCE and you'll see more green and less amber. BUFFER is how cautious you are: two minutes is fine for a predictable walk; with a less reliable one (or children) you might want five.
A few things to know. The light updates once a minute, and TfL's expected times are live but not perfect, so treat a sudden jump to red as "look at your app", not gospel. A cancelled train doesn't turn it red: the planner just stops offering it, and the light moves to the next journey that will get you there. The 7–9am window is the relay's own clock. And because it runs every minute, a morning fills the automation's run history, which keeps the last hundred runs.
Make it yours
The pattern — schedule, fetch, decide, light — works for anything with a free public API that allows browser requests. A few that do:
- A frost light. The same Open-Meteo call with
hourly=temperature_2mtells you whether to leave five minutes early to scrape the car. - A greenest-hour light for UK electricity, from the Carbon Intensity API, to tell you when to put the dishwasher on.
- A goal light. Flash your team's colours when they score.
If you build one, I'd love to see it — email me.
For developers
Everything above runs inside Homecast's automation engine, on your relay. If you'd rather run the logic yourself — on a server, a Raspberry Pi or a GitHub Action — the same light is one request to the REST API with an access token from Settings → API Access (it needs Developer Mode on in Settings → Account):
curl -X POST https://api.homecast.cloud/rest/state \
  -H "Authorization: Bearer $HOMECAST_TOKEN" \
  -H "Content-Type: application/json" \
  -d '{"my_home_a1b2": {"hallway_c3d4": {"hall_lamp_e5f6": {"on": true, "hue": 120, "saturation": 100, "brightness": 80}}}}'
The names are the keys GET /rest/state returns for your own home. Give the token Control on just the one home it needs: if it ever leaks, that's all it can touch.
The honest limits
- The relay has to be running. If you host your own on a Mac and it's asleep, nothing happens. On the Cloud plan we run the relay, so there's nothing to keep awake.
- Phone notifications need Homecast Cloud. In the free Community Edition, Notify shows a banner on the Mac rather than your phone.
- The service has to allow it. The HTTP Request runs on your relay the way a web page would, so it can only reach services that accept requests from a browser. Open-Meteo and TfL do; plenty of others don't.